实验介绍
本实验使用Keepalived为LVS提供高可用服务,同时LVS为后端的Nginx1和Nginx2提供负载均衡服务,最终通过Keepalived+LVS实现Nginx高可用负载均衡集群。
组网介绍
如下图所示,本实验由5台主机组成,Nginx1和Nginx2提供web服务,LVS1和LVS2通过Keepalived组成高可用集群,向后端的Nginx1和Nginx2提供负载均衡。
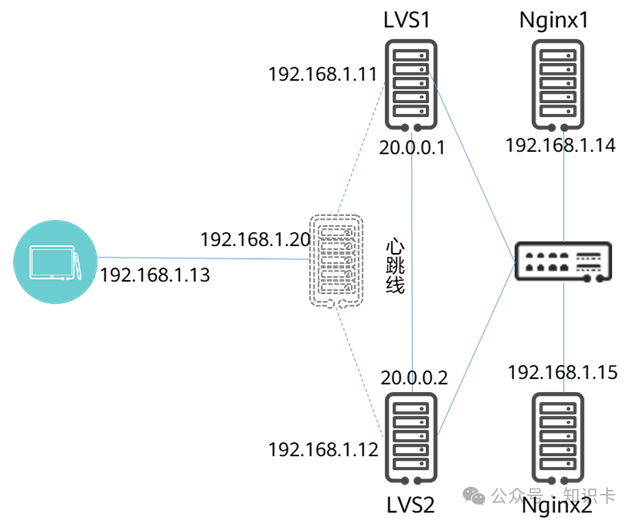
LVS1:ens36 192.168.1.11/24;ens33 20.0.0.1/24
LVS2:ens36 192.168.1.12/24;ens33 20.0.0.1/24
VIP:192.168.1.20
Nginx1:DIP ens36 192.168.1.14
Nginx2:DIP ens36 192.168.1.15
client:192.168.1.13/24
实验步骤
步骤1 为LVS1和LVS2配置IP地址
LVS1的IP配置
nmcli connection modify ens33 ipv4.method manual ipv4.addresses 20.0.0.1/24nmcli connection modify ens36 ipv4.method manual ipv4.addresses 192.168.1.11/24nmcli connection up ens33nmcli connection up ens36
LVS2的IP配置
nmcli connection modify ens33 ipv4.method manual ipv4.addresses 20.0.0.2/24nmcli connection modify ens36 ipv4.method manual ipv4.addresses 192.168.1.12/24nmcli connection up ens33nmcli connection up ens36
测试心跳IP和业务IP的连通性


步骤2 为LVS1和LVS2安装keepalived和ipvsadm并修改配置文件
yum install -y keepalived ipvsadmLVS1的keepalived配置文件修改为
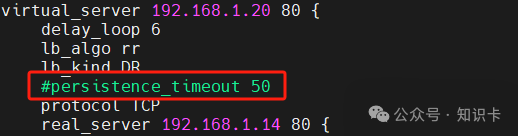
! Configuration File for keepalivedglobal_defs {router_id Cluster1}vrrp_instance Nginx {state MASTER # 两个 DS,一个为 MASTER 一个为 BACKUPinterface ens36 # 当前 DIP 对应的网络接口virtual_router_id 51 # 虚拟路由 ID(0-255),在一个 VRRP 实例中主备服务器 ID 必须一样priority 255 # 优先级值设定:MASTER 要比 BACKUP 的值大advert_int 1 # 通告时间间隔:单位秒,主备要一致authentication { # 认证机制,主从节点保持一致即可auth_type PASSauth_pass 1111}virtual_ipaddress {192.168.1.20/24 # VIP,可配置多个}}virtual_server 192.168.1.20 80 {delay_loop 6 # 设置健康状态检查时间间隔(秒)lb_algo rr # 调度算法,这里用了 rr 轮询算法lb_kind DR # 这里测试用了 Direct Route 模式persistence_timeout 50 # 持久连接超时时间protocol TCPreal_server 192.168.1.14 80 {weight 1TCP_CHECK { #定义TCP健康检查参数connect_timeout 3 #连接超时时间为3秒retry 3 #重试次数为3次delay_before_retry 3 #每次重试之间的延迟时间为3秒}}real_server 192.168.1.15 80 {weight 2TCP_CHECK {connect_timeout 3retry 3delay_before_retry 3}}}
LVS2的keepalived配置文件修改为
! Configuration File for keepalivedglobal_defs {router_id Cluster2}vrrp_instance Nginx {state BACKUPinterface ens36virtual_router_id 51priority 100advert_int 1authentication {auth_type PASSauth_pass 1111}virtual_ipaddress {192.168.1.20/24}}virtual_server 192.168.1.20 80 {delay_loop 6lb_algo rrlb_kind DRpersistence_timeout 50protocol TCPreal_server 192.168.1.14 80 {weight 1TCP_CHECK {connect_timeout 3retry 3delay_before_retry 3}}real_server 192.168.1.15 80 {weight 2TCP_CHECK {connect_timeout 3retry 3delay_before_retry 3}}}
在两台主机上重启keepalived服务使其生效
systemctl restart keepalived步骤3 为后端服务器安装Nginx并配置虚拟主机
Nginx1上执行
#安装niginxyum install -y nginx#向nginx的主页面中写入想要的信息echo "hello,10.0.0.2" > /usr/share/nginx/html/index.html#启动nginx服务systemctl enalbe nginx.service --now
Nginx2上执行
#安装niginxyum install -y nginx#向nginx的主页面中写入想要的信息echo "hello,10.0.0.3" > /usr/share/nginx/html/index.html#启动nginx服务systemctl enalbe nginx.service --now
步骤4 为后端服务器配置IP
按照规划,将Nginx1和nginx2的网关设置为网关的地址。配置命令参考以下内容
以Nginx1为例配置如下,Nginx2按规划修改IP地址即可:
nmcli con mod ens36 ipv4.address 192.168.1.14/24 ipv4.gateway 192.168.1.1nmcli con up ens36
增加一个虚拟接口,并为其配置VIP
nmcli connection add type dummy ifname dummy2 ipv4.method manual ipv4.addresses 192.168.1.20/32修改内核中关于ARP的配置,关闭arp广播和arp应答
cat >> /etc/sysctl.conf << EOFnet.ipv4.conf.all.arp_ignore=1net.ipv4.conf.all.arp_announce=2net.ipv4.conf.dummy2.arp_ignore=1net.ipv4.conf.dummy2.arp_announce=2EOF
配置完成后,用sysctl -p使其生效
sysctl -p | grep arp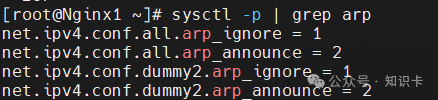
步骤5 HA测试
首先查看一下当前的VIP,我们发现在LVS1上

我们关闭LVS1的keepalvied的进程,模拟故障场景,再次查看VIP的情况

我们发现VIP已经漂移到了LVS2上了

步骤6 负载均衡测试
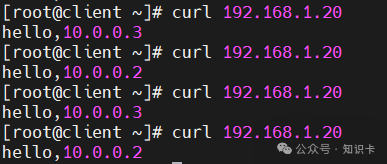
从客户端向VIP发起请求
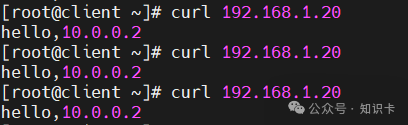
我们看到这里只有Nginx1响应服务,可以通过ipvsadm命令查看,通过LVS的链接默认开启了持久连接,且超时时间设置为了50,因此每次连接都转发到了第一次分配的服务器上

我们将keepalived配置文件中的相关配置注释掉,然后重启服务,再次验证
重新启动服务后,再次测式结果如下:
我们看到已经可以用指定的轮询方式来提供负载均衡了