作者:微信小助手
发布时间:2023-06-16T15:56:15
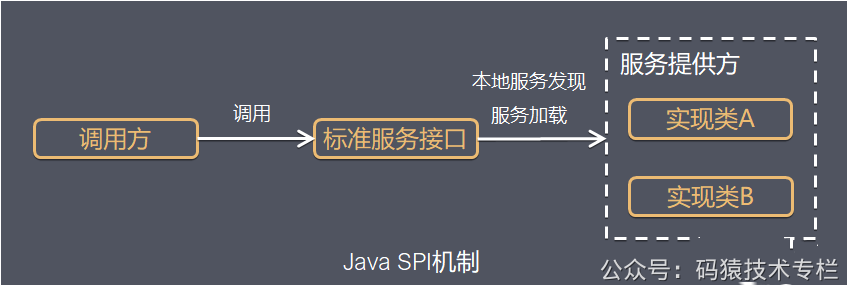
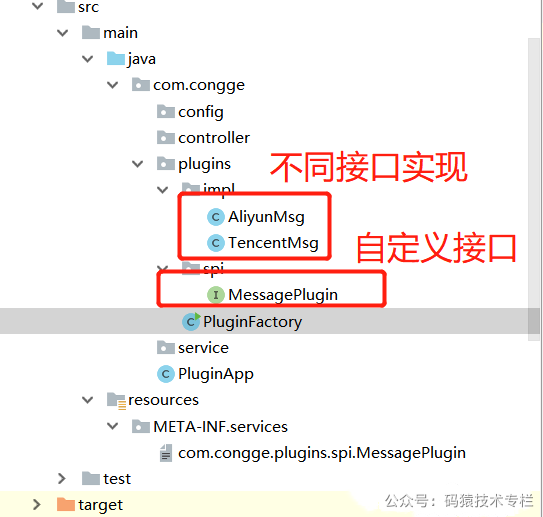
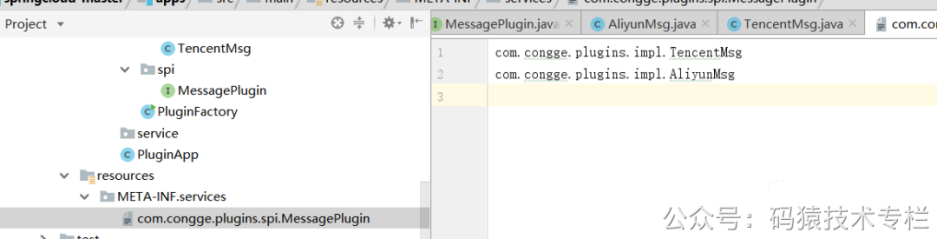
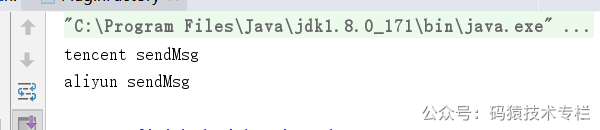
大家好,我是不才陈某~ 插件化开发模式正在很多编程语言或技术框架中得以广泛的应用实践,比如大家熟悉的jenkins,docker可视化管理平台rancher,以及日常编码使用的编辑器idea,vscode等,随处可见的带有热插拔功能的插件,让系统像插了翅膀一样,大大提升了系统的扩展性和伸缩性,也拓展了系统整体的使用价值,那么为什么要使用插件呢? 实现服务模块之间解耦的方式有很多,但是插件来说,其解耦的程度似乎更高,而且更灵活,可定制化、个性化更好。 举例来说,代码中可以使用设计模式来选择使用哪种方式发送短信给下单完成的客户,问题是各个短信服务商并不一定能保证在任何情况下都能发送成功,怎么办呢?这时候设计模式也没法帮你解决这个问题,如果使用定制化插件的方式,结合外部配置参数,假设系统中某种短信发送不出去了,这时候就可以利用插件动态植入,切换为不同的厂商发短信了。 以spring来说,之所以具备如此广泛的生态,与其自身内置的各种可扩展的插件机制是分不开的,试想为什么使用了spring框架之后可以很方便的对接其他中间件,那就是spring框架提供了很多基于插件化的扩展点。 插件化机制让系统的扩展性得以提升,从而可以丰富系统的周边应用生态。 有了插件之后,第三方应用或系统如果要对接自身的系统,直接基于系统预留的插件接口完成一套适合自己业务的实现即可,而且对自身系统的侵入性很小,甚至可以实现基于配置参数的热加载,方便灵活,开箱即用。 以java为例,这里结合实际经验,整理一些常用的插件化实现思路: serviceloader是java提供的spi模式的实现。按照接口开发实现类,而后配置,java通过ServiceLoader来实现统一接口不同实现的依次调用。而java中最经典的serviceloader的使用就是Java的spi机制。 SPI全称 Service Provider Interface ,是JDK内置的一种服务发现机制,SPI是一种动态替换扩展机制,比如有个接口,你想在运行时动态给他添加实现,你只需按照规范给他添加一个实现类即可。比如大家熟悉的jdbc中的Driver接口,不同的厂商可以提供不同的实现,有mysql的,也有oracle的,而Java的SPI机制就可以为某个接口寻找服务的实现。 下面用一张简图说明下SPI机制的原理 如下工程目录,在某个应用工程中定义一个插件接口,而其他应用工程为了实现这个接口,只需要引入当前工程的jar包依赖进行实现即可,这里为了演示我就将不同的实现直接放在同一个工程下; 定义接口 定义两个不同的实现 在resources目录按照规范要求创建文件目录,并填写实现类的全类名 自定义服务加载类 运行上面的程序后,可以看到下面的效果,这就是说,使用ServiceLoader的方式可以加载到不同接口的实现,业务中只需要根据自身的需求,结合配置参数的方式就可以灵活的控制具体使用哪一个实现。 serviceloader其实是有缺陷的,在使用中必须在META-INF里定义接口名称的文件,在文件中才能写上实现类的类名,如果一个项目里插件化的东西比较多,那很可能会出现越来越多配置文件的情况。关注公众号:码猿技术专栏,回复关键词:1111 获取阿里内部Java性能调优手册!所以在结合实际项目使用时,可以考虑下面这种实现思路: 在上文中案例基础上,我们做如下调整; 在配置文件中,将具体的实现类配置进去 通过这个类,将上述配置文件中的实现类封装到类对象中,方便后续使用; 使用上述的封装对象通过类加载的方式动态的在程序中引入 启动工程代码后,调用接口: 更进一步,在很多场景下,可能我们并不想直接在工程中引入接口实现的依赖包,这时候可以考虑通过读取指定目录下的依赖jar的方式,利用反射的方式进行动态加载,这也是生产中一种比较常用的实践经验。 具体实践来说,主要为下面的步骤: 在上述的基础上,按照上面的实现思路来实现一下; 在当前工程下创建一个lib目录,并将依赖的jar放进去 添加一个工具类,用于读取指定目录下的jar,并通过反射的方式,结合配置文件中的约定配置进行反射方法的执行;一、前言
1.1 使用插件的好处
1.1.1 模块解耦
1.1.2 提升扩展性和开放性
1.1.3 方便第三方接入
1.2 插件化常用实现思路
二、Java常用插件实现方案
2.1 serviceloader方式
2.1.1 java spi
2.1.2 java spi 简单案例
public interface MessagePlugin {

    public String sendMsg(Map msgMap);

}public class AliyunMsg implements MessagePlugin {
@Override
public String sendMsg(Map msgMap) {
System.out.println("aliyun sendMsg");
return "aliyun sendMsg";
}
}
public class TencentMsg implements MessagePlugin {
@Override
public String sendMsg(Map msgMap) {
System.out.println("tencent sendMsg");
return "tencent sendMsg";
}
}
 public static void main(String[] args) {
        ServiceLoader<MessagePlugin> serviceLoader = ServiceLoader.load(MessagePlugin.class);
        Iterator<MessagePlugin> iterator = serviceLoader.iterator();
        Map map = new HashMap();
        while (iterator.hasNext()){
            MessagePlugin messagePlugin = iterator.next();
            messagePlugin.sendMsg(map);
        }
    }
2.2 自定义配置约定方式
2.2.1 添加配置文件
server :
  port : 8081
impl:
  name : com.congge.plugins.spi.MessagePlugin
  clazz :
    - com.congge.plugins.impl.TencentMsg
    - com.congge.plugins.impl.AliyunMsg
2.2.2 自定义配置文件加载类
import lombok.Getter;
import lombok.Setter;
import lombok.ToString;
import org.springframework.boot.context.properties.ConfigurationProperties;
@ConfigurationProperties("impl")
@ToString
public class ClassImpl {
    @Getter
    @Setter
    String name;

    @Getter
    @Setter
    String[] clazz;
}
2.2.3 自定义测试接口
import com.congge.config.ClassImpl;
import com.congge.plugins.spi.MessagePlugin;
import org.springframework.beans.factory.annotation.Autowired;
import org.springframework.web.bind.annotation.GetMapping;
import org.springframework.web.bind.annotation.RestController;

import java.util.HashMap;

@RestController
public class SendMsgController {

    @Autowired
    ClassImpl classImpl;

    //localhost:8081/sendMsg
    @GetMapping("/sendMsg")
    public String sendMsg() throws Exception{
        for (int i=0;i<classImpl.getClazz().length;i++) {
            Class pluginClass= Class.forName(classImpl.getClazz()[i]);
            MessagePlugin messagePlugin = (MessagePlugin) pluginClass.newInstance();
            messagePlugin.sendMsg(new HashMap());
        }
        return "success";
    }

}
2.2.4 启动类
@EnableConfigurationProperties({ClassImpl.class})
@SpringBootApplication
public class PluginApp {

    public static void main(String[] args) {
        SpringApplication.run(PluginApp.class,args);
    }

}localhost:8081/sendMsg,在控制台中可以看到下面的输出信息,即通过这种方式也可以实现类似serviceloader的方式,不过在实际使用时,可以结合配置参数进行灵活的控制;
2.3 自定义配置读取依赖jar的方式
2.3.1 创建约定目录
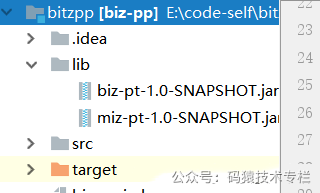
2.3.2 新增读取jar的工具类
@Component
public class ServiceLoaderUtils {

    @Autowired
    ClassImpl classImpl;


    public static void loadJarsFromAppFolder() throws Exception {
        String path = "E:\\code-self\\bitzpp\\lib";
        File f = new File(path);
        if (f.isDirectory()) {
            for (File subf : f.listFiles()) {
                if (subf.isFile()) {
                    loadJarFile(subf);
                }
            }
        } else {
            loadJarFile(f);
        }
    }

    public static void loadJarFile(File path) throws Exception {
        URL url = path.toURI().toURL();
        // 可以获取到AppClassLoader,可以提到前面,不用每次都获取一次
        URLClassLoader classLoader = (URLClassLoader) ClassLoader.getSystemClassLoader();
        // 加载
        //Method method = URLClassLoader.class.getDeclaredMethod("sendMsg", Map.class);
        Method method = URLClassLoader.class.getMethod("sendMsg", Map.class);

        method.setAccessible(true);
        method.invoke(classLoader, url);
    }

    public  void main(String[] args) throws Exception{
        System.out.println(invokeMethod("hello"));;
    }

    public String doExecuteMethod() throws Exception{
        String path = "E:\\code-self\\bitzpp\\lib";
        File f1 = new File(path);
        Object result = null;
        if (f1.isDirectory()) {
            for (File subf : f1.listFiles()) {
                //获取文件名称
                String name = subf.getName();
                String fullPath = path + "\\" + name;
                //执行反射相关的方法
                //ServiceLoaderUtils serviceLoaderUtils = new ServiceLoaderUtils();
                //result = serviceLoaderUtils.loadMethod(fullPath);
                File f = new File(fullPath);
                URL urlB = f.toURI().toURL();
                URLClassLoader classLoaderA = new URLClassLoader(new URL[]{urlB}, Thread.currentThread()
                        .getContextClassLoader());
                String[] clazz = classImpl.getClazz();
                for(String claName : clazz){
                    if(name.equals("biz-pt-1.0-SNAPSHOT.jar")){
                        if(!claName.equals("com.congge.spi.BitptImpl")){
                            continue;
                        }
                        Class<?> loadClass = classLoaderA.loadClass(claName);
                        if(Objects.isNull(loadClass)){
                            continue;
                        }
                        //获取实例
                        Object obj = loadClass.newInstance();
                        Map map = new HashMap();
                        //获取方法
                        Method method=loadClass.getDeclaredMethod("sendMsg",Map.class);
                        result = method.invoke(obj,map);
                        if(Objects.nonNull(result)){
                            break;
                        }
                    }else if(name.equals("miz-pt-1.0-SNAPSHOT.jar")){
                        if(!claName.equals("com.congge.spi.MizptImpl")){
                            continue;
                        }
                        Class<?> loadClass = classLoaderA.loadClass(claName);
                        if(Objects.isNull(loadClass)){
                            continue;
                        }
                        //获取实例
                        Object obj = loadClass.newInstance();
                        Map map = new HashMap();
                        //获取方法
                        Method method=loadClass.getDeclaredMethod("sendMsg",Map.class);
                        result = method.invoke(obj,map);
                        if(Objects.nonNull(result)){
                            break;
                        }
                    }
                }
                if(Objects.nonNull(result)){
                    break;
                }
            }
        }
        return result.toString();
    }

    public Object loadMethod(String fullPath) throws Exception{
        File f = new File(fullPath);
        URL urlB = f.toURI().toURL();
        URLClassLoader classLoaderA = new URLClassLoader(new URL[]{urlB}, Thread.currentThread()
                .getContextClassLoader());
        Object result = null;
        String[] clazz = classImpl.getClazz();
        for(String claName : clazz){
            Class<?> loadClass = classLoaderA.loadClass(claName);
            if(Objects.isNull(loadClass)){
                continue;
            }
            //获取实例
            Object obj = loadClass.newInstance();
            Map map = new HashMap();
            //获取方法
            Method method=loadClass.getDeclaredMethod("sendMsg",Map.class);
            result = method.invoke(obj,map);
            if(Objects.nonNull(result)){
                break;
            }
        }
        return result;
    }


    public static String invokeMethod(String text) throws Exception{
        String path = "E:\\code-self\\bitzpp\\lib\\miz-pt-1.0-SNAPSHOT.jar";
        File f = new File(path);
        URL urlB = f.toURI().toURL();
        URLClassLoader classLoaderA = new URLClassLoader(new URL[]{urlB}, Thread.currentThread()
                .getContextClassLoader());
        Class<?> product = classLoaderA.loadClass("com.congge.spi.MizptImpl");
        //获取实例
        Object obj = product.newInstance();
        Map map = new HashMap();
        //获取方法
        Method method=product.getDeclaredMethod("sendMsg",Map.class);
        //执行方法
        Object result1 = method.invoke(obj,map);
        // TODO According to the requirements , write the implementation code.
        return result1.toString();
    }

    public